|
First time trying one of my Tutorials? Then please check my Terms of Use before you continue
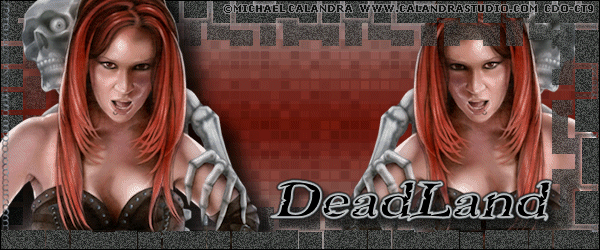
You will need: Font of your choice - I used one called Booter - Five Five Tube of your choice - I will be using the artwork of Michael Calandra License and Tubes available at Creative Design Outlet And my Mask which you will find HERE
Filters: xero/Fritillary
Ok let's begin Change your Foreground to a Light color from your Tube & Background to a Darker color from your Tube Click on the Foreground again and change to Gradient with the following settings
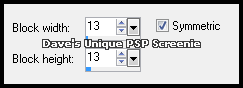
Open a New Image 600x250 ... Flood Fill with your Gradient Effects> Distortion Effects> Pixelate ... with the following settings
Layers> Duplicate Effects> xero> Fritillary ... with the following settings
Change this layers Blend Mode to Multiply and it's Opacity to around 80% Layers> Merge> Merge Down Paste your Tube as a New Layer and position on the Left side of your Tag
Layers> Duplicate ... Image> Mirror ... Activate the left Tube layer and apply a suitable Drop Shadow Activate the Top layer ... Layers> New Raster Layer Flood Fill with a suitable color ... Adjust> Add/Remove Noise> Add Noise ... with the following settings
Load the Mask I provided at the start of the Tutorial (SpawnsFSMask09) ... with these settings
Layers> Merge> Merge Group Layers> New Raster Layer ... Flood Fill with Black Selections> Select All ... Selections> Modify> Contract by 1 ... Hit DELETE on your keyboard Selections> Select None ... Layers> Merge> Merge Down
Now we want to make the Left Tube look like it is popping out of the Tag Using your Freehand Selection Tool you want to make a Selection around any parts of the Mask that cover the Tube Apart from at the Bottom that needs to remain covering the Tube ... Below is how my Selection looked
Selections> Promote Selection to Layer In your Layer Palette move this promoted layer below the Left Tube layer Activate the Mask layer (should be the Top layer) ... Hit DELETE on your keyboard Selections> Select None ... Add Copyrights and your Name
ANIMATING Activate the Bottom layer ... Edit> Copy Now open Animation Shop ... Edit> Paste> As New Animation Hold down CTRL and keep pressing L until you have 11 frames Return to PSP & hide ALL layers apart from the Right Tube layer ... Edit> Copy Special> Copy Merged
Go back to Animation Shop ... Edit> Paste> As New Animation Effects> Insert Image Effect
Click on the Customize button
Click OK then OK again ... Edit> Select All ... Edit> Copy Activate your Background Frames image ... Edit> Select All ...Edit> Paste> Into Selected Frames Move into position and click once
You can delete the animation only image now as you don't need it Return to PSP ... Unhide the Hidden layers and Hide the Left Tube & Bottom layer Edit> Copy Merged ... Go to Animation Shop ... Edit> Paste> As New Animation Hold down CTRL and keep pressing L until you have 11 frames ... Edit> Select All ... Edit> Copy
Activate your Tag Edit> Select All ... Edit> Paste> Into Selected Frames ... move into position and click once Activate the 1st Frame by clicking on it once Animation> Frame Properties ... set to 50 & click ok
Click once on the 2nd Frame Hold down SHIFT on your keyboard & click once on the 11th Frame Frames 2-11 should now be active (highlighted blue) Animation> Frame Properties ... set to 25 & click ok
Tutorial written on the 03/11/2012 ©David Hanslip |


