|
First time trying one of my Tutorials? Then please check my Terms of Use before you continue You will need: Font of your choice - I used one called BetinaScriptXCTT Tube of your choice - I will be using the artwork of Martin Abel License and Tubes available at Creative Design Outlet
Filters: Mura's Meister/Copies Xero/Porcelain (optional) Greg' Factory Output Vol. II/Pool Shadow
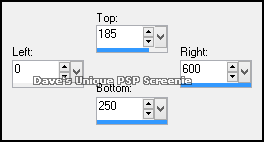
Ok let's begin Open a New Image 600x250 ... Flood Fill with Grey ... #404040 Rename this layer Pool ... Layers> New Raster Layer Make a Custom Selection ... with the following settings
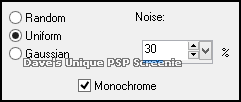
Flood Fill this Selection with White ... Selections> Select None Adjust> Add/Remove Noise> Add Noise ... with the following settings
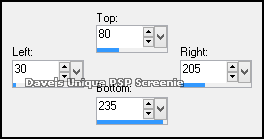
Rename this layer Noise ... Layers> New Raster Layer Make a Custom Selection ... with the following settings
Flood Fill this Selection with Black ... Selections> Modify> Contract by 1 Flood Fill this Selection with White Selections> Modify> Contract by 5 ... Hit DELETE on your keyboard ... Selections> Modify> Expand by 3 Layers> New Raster Layer ... Flood Fill with a color from your Tube Adjust> Add/Remove Noise> Add Noise ... with the following settings
Selections> Select None ... Layers> Arrange> Move Down ... Rename this layer Square Paste your Tube as a New Layer Effects> Xero> Porcelain ... change Blue Channel to 0 Effects> 3D Effects> Drop Shadow ... 4, 6, 100, 8, Black
Activate the Square layer ... Selections> Select All ... Selections> Float ... Selections> Defloat Activate the Tube layer and position it so that what you want to keep is inside the Selection Selections> Invert ... Hit DELETE on your keyboard ... Selections> Select None
Activate the Pool layer ... Paste your Tube as a New Layer Move into a position like this, making sure some of the head/hair is off the Tag
Effects> Mura's Meister> Copies ... *Line ... default settings Change this layers Blend Mode to Luminance(L) or Luminance and the Opacity to 50% Layers> New Raster Layer ... Flood Fill with the same color you used for the Square layer Selections> Select All ... Selections> Modify> Contract by 3 ... Hit DELETE on your keyboard Selections> Select None
Adjust> Add/Remove Noise> Add Noise ... with the same settings as earlier Layers> New Raster Layer ... Flood Fill with Black Selections> Select All ... Selections> Modify> Contract by 1 ... Hit DELETE on your keyboard Selections> Select None ... Layers> Arrange> Bring to Top Add Copyrights and your Name
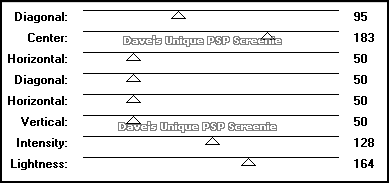
Activate the Pool Layer ... Duplicate this layer three times (for a total of 4) Activate the Pool layer again Effects> Greg' Factory Output Vol. II> Pool Shadow ... with the following settings
Activate the Copy of Pool layer ... Edit> Repeat Pool Shadow ... Change the Vertical to 65 Activate the Copy (2) of Pool layer ... Edit> Repeat Pool Shadow ... Change the Vertical to 80 Activate the Copy (3) of Pool layer ... Edit> Repeat Pool Shadow ... Change the Vertical to 95 Selections> Select None ... Hide the top 3 Pool layers
ANIMATING
Return to PSP and unhide the Copy (3) of Pool layer ... Edit> Copy Special> Copy Merged
Edit> Select All ... Animation> Frame Properties ... change to 15 And that's it. All that's left is to save your Tag ... If you wish to Preview it first View> Animation
Tutorial written on the 01/07/2013 ©David Hanslip |


