|
First time trying one of my Tutorials? Then please check my Terms of Use before you continue
You will need: Font of your choice - I used one called Yataghan Tube of your choice - I will be using the artwork of Jasmine Becket-Griffith License and Tubes available at Creative Design Outlet
Filters: Mura's Meister/Copies Greg's Factory Output vol. II/Pool Shadow
Ok let's begin Change your Foreground to Dark color from your Tube and Background to a Light color from your Tube Open a New Image 600x250 ... Flood Fill with your Foreground color
Paste your Tube as a New Layer Effects> Mura's Meister> Copies ... *Wall Paper(rotate) ... default settings Edit> Repeat Copies ... same settings as above
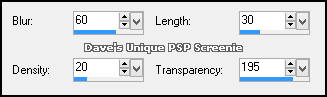
Adjust> Blur> Motion Blur ... with the following settings
Selections> Select All ... Selections> Clip to Canvas Image> Crop to Selection ... Effects> Edge Effects> Enhance More Effects> Texture Effects> Fur ... with the following settings
Change this layers Blend Mode to Luminance Layers> Merge> Merge Down ... rename this layer Pool
Layers> New Raster Layer Make a Custom Selection ... with the following settings
Flood Fill the Selection with your Foreground color Layers> New Raster Layer .... Flood Fill the Selection with your Background color Selections> Select None ... Hide the Top layer for the moment Activate the Middle layer
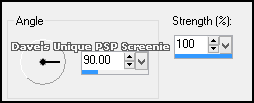
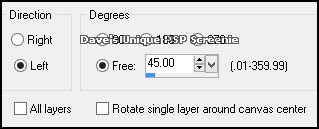
Image> Free Rotate ... with the following settings
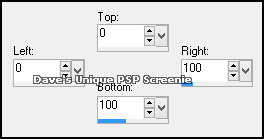
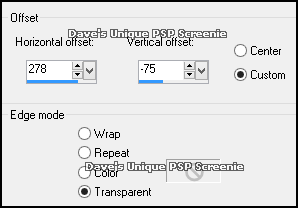
Effects> Image Effects> Offset ... with the following settings
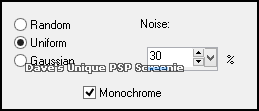
Effects> Mura's Meister> Copies ...*Line ... change the Number to 11 Layers> Duplicate ... Image> Flip ... Layers> Merge> Merge Down Adjust> Add/Remove Noise> Add Noise ... with the following settings
Effects> 3D Effects> Drop Shadow ... 0, 0, 100, 2, White Edit> Repeat Drop Shadow
Unhide and Activate the Top layer ... Image> Free Rotate ... same settings as earlier Effects> Image Effects> Offset ... with the following settings
Effects> Mura's Meister> Copies ... same settings as earlier Adjust> Add/Remove Noise> Add Noise ... same settings as earlier Selections> Select All ... Selections> Float ... Selections> Defloat
Paste your Tube as a New Layer Position so what you want to keep is inside the middle of the Selection like so (resize if needed)
Selections> Load/Save Selection> Save Selection to Alpha Channel When window pops up click the Drop Down box and select the option that has the same name as your Tag Name it whatever you like and click on Save
Selections> Select None Effects> Mura's Meister> Copies ... *Line ... change the Number to 5 Selections> Load/Save Selection> Load Selection from Alpha Channel When window pops up click the Top left Drop Down box and select the option that has the same name as your Tag Click on Bottom Left Drop Down box and select the one with the name you gave it earlier the settings on the right should match these
Click on the Load button
Selections> Invert ... Hit DELETE on your Keyboard ... Selections> Select None Change this layers Blend Mode to Luminance and Opacity to around 50% Layers> Merge> Merge Down Effects> 3D Effects> Drop Shadow ... 0, 0, 100, 4, Black Edit> Repeat Drop Shadow
Paste your Tube as a New Layer, position on the Left side of your Tag and apply a suitable Drop Shadow Layers> Duplicate ... Image Mirror
Layers> New Raster Layer ... Flood Fill with your Background color Selections> Select All ... Selections> Modify> Contract by 1 ... Hit DELETE on your keyboard Selections> Select None Adjust> Add/Remove Noise> Add Noise ... with the same settings as earlier
Selections> Select All ... Selections> Clip to Canvas ... Image> Crop to Selection Activate the Pool layer ... Duplicate this layer three times (for a total of 4)
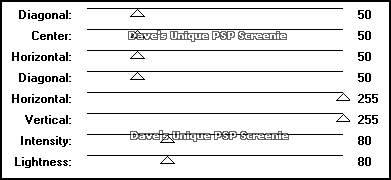
Activate the Pool layer again Effects> Greg's Factory Output vol. II> Pool Shadow ... with the following settings
Activate the Copy of Pool layer ... Effects> Greg's Factory Output Vol. II> Pool Shadow ... change Vertical to 205 Activate the Copy (2) of Pool layer ... Effects> Greg's Factory Output Vol. II> Pool Shadow ... change Vertical to 155 Activate the Copy (3) of Pool layer ... Effects> Greg's Factory Output Vol. II> Pool Shadow ... change Vertical to 105 Hide the Top 3 Pool layers for now ... Add Copyrights and your Name
ANIMATING Edit> Copy Special> Copy Merged
Go back to Animation Shop ... Edit> Paste> After Current Frame
Return to PSP and unhide the Copy (3) of Pool layer ... Edit> Copy Special> Copy Merged Go back to Animation Shop ... Edit> Paste> After Current Frame
Edit> Select All ... Animation> Frame Properties ... change to 16 And that's it. All that's left is to save your Tag ... If you wish to Preview it first View> Animation
Tutorial written on the 06/08/2013 ©David Hanslip |