|
First time trying one of my Tutorials? Then please check my Terms of Use before you continue
You will need: Fonts of your choice - I used Crostini for the background Text and Immortal for the Name Tubes of your choice - I will be using the artwork of Deanna Bach-Talsma This artist is not currently selling her art in Tube Format (I used a two part Tube one part being the Lady the other the Fox)
Filters: Mura's Meister/Copies Eye Candy 6:Textures/Swirl
Ok let's begin Change your Foreground to a Medium color from your Tube Change your Background color a Light color from your Tube Change your Foreground to Gradient ... with the following settings
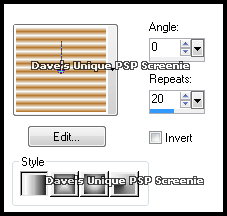
Open a New Image 600x250 ... Flood Fill with your Gradient Effects> Texture Effects> Weave ... with the following settings
Adjust> Blur> Motion Blur ... with the following settings
Change your Foreground to Color ... Layers> New Raster Layer Make a Custom Selection ... with the following settings
Flood Fill this Selection with your Foreground color Selections> Modify> Contract by 3 ... Hit DELETE on your keyboard Selections> Select None ... Effects> Image Effects> Offset ... with the following settings
Image> Free Rotate ... with the following settings
Effects> Mura's Meister> Copies ... *Line ... Default settings Layers> Duplicate ... Image> Flip ... Layers> Merge> Merge Down
Select your Magic Wand Tool ... with the following settings
Click once inside each of the rotated squares Selections> Modify> Expand by 2 ... Layers> New Raster Layer Flood Fill the Selections with your Background color ... Selections> Select None Rename this layer Swirl ... Layers> Arrange> Move Down
Active the Bottom layer ... with your Text Tool type out some wording I used "FoxyLady" ... These are the settings I used Font - Crostini ... Size - 20 ... Bold ... Sharp ... Color Black
Objects> Align> Center in Canvas ... Layers> Convert to Raster Layer Effects> Mura's Meister> Copies ... Tiling ... Change the Tile Gap to 3 Change this layers Blend Mode to Soft Light and Opacity to 50%
Activate the Swirl layer and Duplicate it twice (for a total of 3) Activate the Swirl layer again ... Effects> Eye Candy 6: Textures> Swirl ... with the following settings
Activate the Copy of Swirl layer Effects> Eye Candy 6: Textures> Swirl ... click on the Random Seed button once then on ok Activate the Copy (2) of Swirl layer Effects> Eye Candy 6: Textures> Swirl ... click on the Random Seed button once then on ok
Hide the 2 Top Swirl layers for now ... Activate the Top Layer Paste your Tube as a New Layer, position on the Left side of your Tag and apply a suitable Drop Shadow Paste your second Tube as a New Layer, position on the Right side of your Tag and apply a suitable Drop Shadow
Layers> New Raster Layer ... Flood Fill with your Foreground color Selections> Select All ... Selections> Modify> Contract by 3 ... Hit DELETE on your keyboard Selections> Select None ... Adjust> Add/Remove Noise> Add Noise ... with the following settings
Layers> New Raster Layer ... Flood Fill with Black Selections> Select All ... Selections> Modify> Contract by 1 ... Hit DELETE on your keyboard Selections> Select None ... Add Copyrights and your Name
ANIMATING Edit> Copy Special> Copy Merged Go back to Animation Shop ...Edit> Paste> After Current Frame Go back to Animation Shop ...Edit> Paste> After Current Frame
Tutorial written on the 28/08/2012 ©David Hanslip |