|
First time trying one of my Tutorials? Then please check my Terms of Use before you continue
You will need: Font of your choice - I used one called Big Bloke BB Tube of your choice - I will be using the artwork of Dirk Richter License and Tubes available at Creative Design Outlet My Selection and Image HERE Unzip and pop the Selection into your Selections Folder & Image somewhere easy to find
Filters: Mura's Meister/Copies Funhouse/Xaggerate Eye Candy 6/Gradient Glow
Ok let's begin Open a New Image 600x250 ... Paste your Tube as a New Layer Effects> Mura's Meister> Copies ... *Wall Paper(rotate) ... default settings Edit> Repeat Copies ... Crop Image 600x250
Layers> Duplicate Effects> Funhouse> Xaggerate ... with the following settings
Open my image (Spawns-GingerFuzzImage) Edit> Copy ... Activate your Tag ... Edit> Paste As New Layer
Load the Selection I provided at the start of this Tutorial (Spawns-GingerFuzz) Activate the Middle layer ... Hit DELETE once on your keyboard Selections> Select None
Effects> Eye Candy 6> Gradient Glow ... with the following settings
Effects> Eye Candy 6> Gradient Glow ... change the Overall Opacity to 60% and color to White Activate the Top layer Paste your Tube as a New Layer, position on the Right side of your Tag and apply a suitable Drop Shadow
Layers> New Raster Layer ... Flood Fill with color of choice Selections> Select All ... Selections> Modify> Contract by 1 ... Hit DELETE on your keyboard Selections> Select None
Add Copyrights and your Name
ANIMATING
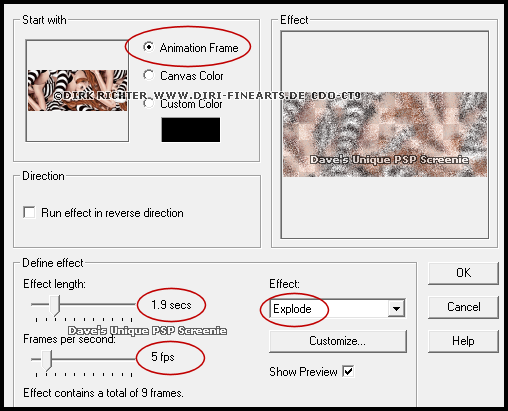
Effects> Insert Image Effect
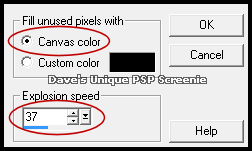
Click on the Customize button
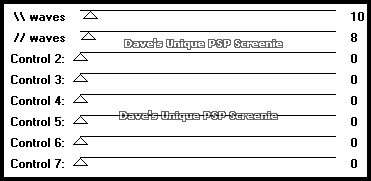
Click once on the first frame ... Edit> Copy ... Edit> Paste> As New Animation Hold down CTRL and keep pressing L until you have the same amount of frames as your animation (should be 10)
Activate your animation ... Edit> Select All ... Edit> Copy Activate your Tag ... Edit> Select All ...Edit> Paste> Into Selected Frames Move into position and click once (I zoomed in to help with positioning) You can delete the animation only image now as you don't need it
Return to PSP ... Hide the Bottom layer Edit> Copy Special> Copy Merged ... Go to Animation Shop Edit> Paste> As New Animation Hold down CTRL and keep pressing L until you have the same amount of frames as your Tag (should be 10) Edit> Select All ... Edit> Copy
Activate your Tag Edit> Select All ... Edit> Paste> Into Selected Frames ... move into position and click once Click on the first frame ... Animation> Frame Properties ... change to 130
Click on the second frame ... hold down the Shift key on your keyboard and click on the tenth frame Frames 2-10 should now be active (highlighted blue) ... Animation> Frame Properties ... change to 17
Tutorial written on the 05/01/2013 ©David Hanslip |