|
First time trying one of my Tutorials? Then please check my Terms of Use before you continue
You will need: Font of your choice - I used one called Trek Tube and Close-Up of your choice - I will be using the artwork of Jamie Kidd License and Tubes available at Creative Design Outlet One of my Templates SpawnsFSTemplate084
Filters: Mura's Meister/Copies Eye Candy 6: Textures/Brushed Metal DSB Flux/Bright Noise
Ok let's begin Open my Template ... Window> Duplicate ... Close Original ... Delete the Credits layer Activate the Border layer ... Paste your Tube as a New Layer Move to a suitable position covering the downward line (see my tag for reference) Layers> Duplicate ... Move this layer in your layer palette so it is above the Top Right Foreground layer
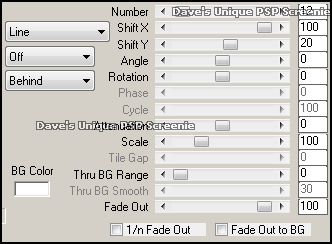
With this Tube layer still active Effects> Mura's Meister> Copies ... *Line ... with the following settings but the Number to one of your choosing
Change this layers Blend Mode to Luminance or Luminance(L) ... rename this layer MM Activate the Top Right Foreground layer ... Selections> Select All ... Selections> Float Selections> Defloat ... Selections> Invert ... Activate the MM layer ... Edit> Clear Selections> Select None
Activate the Bottom Right Foreground layer Effects> Eye Candy 6: Textures> Brushed Metal Click on the "Settings" tab and then on the "settings tour " folder then click on "Linear: Steel, Rough & Angled " so it is highlighted blue Click on the "Basic" tab and change the Metal Color to one from your Tube click the "Random Seed" button once
Activate the Left Foreground layer Effects> Eye Candy 6: Textures> Brushed Metal Change the Metal Color to #202020 and the Direction to 0 ... click the "Random Seed" button once Paste your Close-Up as a New Layer & move into a suitable position on the left side of your canvas Change this layers Blend Mode to Luminance or Luminance(L) and the Opacity to around 50%
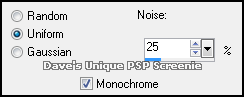
Activate the Right Line Background layer Selections> Select All ... Selections> Float ... Selections> Defloat Layers> New Raster Layer ... Flood Fill the selections with the color from Tube you used for Brushed Metal Selections> Select None ... Adjust> Add/Remove Noise> Add Noise ... with the following settings
Layers> Merge> Merge Down
Activate the Right Line Outline layer Selections> Select All ... Selections> Float ... Selections> Defloat Selections> Modify> Expand by 1 Layers> New Raster Layer ... Flood Fill the selections with a color of your choice Selections> Select None ... Layers> Merge> Merge Down ... Rename this layer Flux Duplicate this layer twice
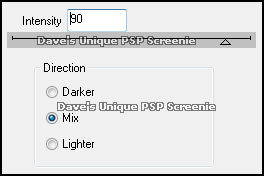
Activate the Flux layer again Effects> DSB Flux> Bright Noise ... with the following settings
Activate the Copy of Flux layer Effects> DSB Flux> Bright Noise ... click on the Mix button once then on ok Activate the Copy (2) of Flux layer Effects> DSB Flux> Bright Noise ... click on the Mix button once then on ok Hide the Top 2 Flux layers
Activate the Tube layer and apply a suitable Drop Shadow Layers> Arrange> Move Down ... Activate the Border layer Selections> Select All ... Selections> Float ... Selections> Defloat Layers> New Raster Layer ... Flood Fill the selection with the color you used on the Flux layer Selections> Select None ... Delete the Border layer
Add Copyrights and your Name
ANIMATING
Edit> Copy Special> Copy Merged Go back to Animation Shop ... Edit> Paste> After Current Frame Edit> Copy Special> Copy Merged Go back to Animation Shop ... Edit> Paste> After Current Frame
Tutorial written on 29/12/2017 ©David Hanslip |