|
First time trying one of my Tutorials? Then please check my Terms of Use before you continue
You will need: Font of your choice - I used one called Janis Tube of your choice - I will be using the artwork of Hannah Lynn License and Tubes available at Creative Design Outlet
Filters: Mura's Meister/Copies
Ok let's begin Change your Foreground and Background to 2 colors from your Tube Paste your Tube as a New Image ... Image> Resize ... with the following settings Lock Aspect Ratio - checked Resize All Layers - checked Pixel Dimensions - Set at Pixels change the Height to 250
Layers> New Raster Layer ... Flood Fill with your Foreground color Layers> Arrange> Send to Bottom Activate the Top layer ... Layers> New Raster Layer ... Flood Fill with your Background color Selections> Select All ... Selections> Modify> Contract by 2 ... Hit DELETE on your keyboard Selections> Select None
Adjust> Add/Remove Noise> Add Noise ... with the following settings
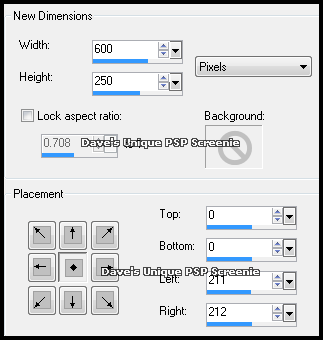
Layers> Merge> Merge Visible Image> Canvas Size ... with the following settings
Effects> Mura's Meister> Copies ... *Feedback(v-random) ... default settings Image> Mirror ... Layers> New Raster .... Flood Fill with your Background color Effects> Texture Effects> Weave ... with the following settings
Adjust> Blur> Motion Blur ... with the following settings
Layers> Arrange> Send to Bottom ... Activate the Top layer Effects> 3D Effects> Drop Shadow ... with the following settings
Paste your Tube as a New Layer, position on the Right side of your Tag and apply a suitable Drop Shadow
Add Copyrights and your Name and that's it all that's left is to save your Tag
Tutorial written on the 09/09/2012 ©David Hanslip |