|
First time trying one of my Tutorials? Then please check my Terms of Use before you continue
You will need: Font of your choice - I used one called Victorina Black Tube of your choice - I will be using the artwork of Ed Mironiuk This artist is no longer selling their art in Tube Format My 2 selections which you can get HERE ... unzip into your Selections folder
Filters: Eye Candy 6: Textures/Brushed Metal Mura's Meister/Copies
Ok let's begin Open a New Image 600x250 Change your Foreground and Background to 2 colors from your Tube Load the Selection I provided at the start of this Tutorial (Spawns-HotSteel01)
Flood Fill with your Foreground color ... Selections> Select None Effects> Eye Candy 6: Textures> Brushed Metal ... with the following settings Click on the "Settings" tab and select the "Linear" folder then select "Steel" Click on the "basics" tab click the button next to Metal Color (the one with the down arrow) and select Foreground Color Click on the Random Seed button once then on OK
Effects> Mura's Meister> Copies ... *Line ... change the Number to 9 Layers> New Raster Layer Load the Selection I provided at the start of this Tutorial (Spawns-HotSteel02) Flood Fill with your Background color ... Selections> Select None
Effects> Mura's Meister> Copies ... same settings as before Rename this layer BM & Duplicate it twice (for a total of 3) Activate the BM layer again Effects> Eye Candy 6: Textures> Brushed Metal ... change the Metal Color to your Background Color Click on the Random Seed button once then on OK
Activate the Copy of BM layer ... Edit> Repeat Brushed Metal... click on the Mix button once then OK Activate the Copy (2) of BM layer ... Edit> Repeat Brushed Meta ... click on the Mix button once then OK Hide the 2 Top BM layers for now
Layers> New Raster Layer Make a Custom Selection ... with the following settings
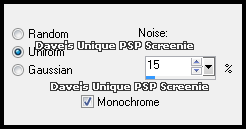
Flood Fill the Selection with your Background color ... Selections> Select None Adjust> Add/Remove Noise> Add Noise ... with the following settings
Layers> New Raster Layer Make a Custom Selection ... with the following settings
Flood Fill with your Foreground color ... Selections> Select None Adjust> Add/Remove Noise> Add Noise ... with the same settings as before Effects> 3D Effects> Drop Shadow ... 0, 0, 100, 4, color of choice Layers> Merge> Merge Down
Paste your Tube as a New Layer, position on the Right side of your Tag and apply a suitable Drop Shadow Layers> New Raster Layer ... Flood Fill with your Background color Adjust> Add/Remove Noise> Add Noise ... with the following settings
Selections> Select All ... Selections> Modify> Contract by 3 ... Hit DELETE on your keyboard Selections> Select None ... Layers> New Raster Layer ... Flood Fill with your Foreground color Selections> Select All ... Selections> Modify> Contract by 1 ... Hit DELETE on your keyboard Selections> Select None ... Layers> Merge> Merge Down Layers> Arrange> Move Down ... Add Copyrights and your Name
**Optional** I wanted my Tube to look like she was popping out of the tag & here is how I did it. Take your Selection Tool and make a Selection like so
Activate the Border layer ... Selections> Promote Selection to Layer ... Selections> Select None In your Layer Palette move this layer above the Tube layer now you will notice the border covers this portion of the Tube so it looks like the Tube is popping out of the Tag
ANIMATING Edit> Copy Special> Copy Merged Go back to Animation Shop ...Edit> Paste> After Current Frame Go back to Animation Shop ...Edit> Paste> After Current Frame Edit> Select All ... Animation> Frame Properties ... change to 12
Tutorial written on the 08/10/2012 ©David Hanslip |