|
First time trying one of my Tutorials? Then please check my Terms of Use before you continue
You will need: Font of your choice - I used one called JohnnyScript Tube of your choice - I will be using the artwork of Jamie Kidd License and Tubes available at Creative Design Outlet In this Tutorial I use the Dash Dot Line Style
Ok let's begin Change your Foreground to a color from your Tube Change your Background to White
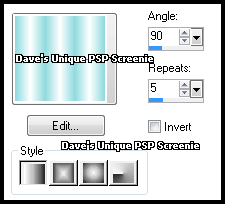
Change your Foreground to Gradient ... with the following settings
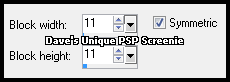
Open a New Image 600x250 ... Flood Fill with your Gradient Effects> Distortion Effects> Pixelate ... with the following settings
Effects> Edge Effects> Enhance ... Layers> New Raster Layer Swap Colors
Flood Fill this layer with your Gradient Effects> Distortion Effects> Pixelate ... same settings as before Effects> Edge Effects> Enhance
Hide the Top layer for now and rename it Border ... Activate the Bottom layer and rename it Background Grab the edge of your tag and drag it out o you can see the grey background
Select your Preset Shape Tool (press P on your keyboard) ... with the following settings Rectangle Anti-Alias - checked Create as Vector - checked Line Style - Dash Dot Width - 3.00
Change your Foreground back to Color (should be white) Make the Background Null
Left Click on the top left of the grey area and drag to the bottom right and you will have something like this
Objects> Align> Center in Canvas ... Layers> Convert to Raster Layer Repeat this process so you have another set of lines inside the first like so
Merge the two lines layers together Effects> Image Effects> Seamless Tiling ... with the following settings
Effects> 3D Effects> Drop Shadow ... 0, 0, 60, 3, Black Rename this layer Lines
Activate your Selection Tool ... with the following settings
Draw out a Selection like so
Activate the Background layer Paste your Tube as a New Layer and position on the left making sure what you want to keep is inside the Selection Selections> Invert ... Hit DELETE on your Keyboard ... Selections> Select None
Hide the Lines layer for now ... With the Tube layer active Effects> 3D Effects> Drop Shadow ... 0, 0, 100, 0, the color you started off with as your Foreground color Shadow on New Layer - Checked
Activate the Tube layer and change its Blend Mode to Luminance or Luminance (L) whichever looks better Effects> Texture Effects> Weave ... with the following settings
Layers> Merge> Merge Visible Unhide the Lines layer and activate it ... Paste your Tube as a New Layer and position on the right Apply a suitable Drop Shadow
Crop Image 600x250 Unhide and activate the Border layer Selections> Select All ... Selections> Modify> Contract by 3 ... Hit DELETE on your keyboard Selections> Select None ... Effects> 3D Effects> Drop Shadow ... 0, 0, 100, 6, Black ( Shadow on New Layer - un-Checked)
Add Copyrights and your Name Activate the Background layer ... Edit> Copy
ANIMATING
Hold down CTRL and keep pressing L until you have 10 frames
Return to PSP and activate the Lines layer Edit> Copy Click once on the 1st frame so it is active
Effects> Insert Image Transition ... with the following settings
Click on Customize ... match these settings
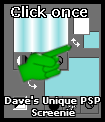
Click on Ok then on OK again ... DELETE the first 2 Frames Edit> Select All ... Edit> Copy Activate your Tag ... Edit> Select All ...Edit> Paste> Into Selected Frames Move into position and click once (I zoomed in to help with positioning) You can delete the animation only image now as you don't need it
Return to PSP Hide the Background and Lines layers Edit> Copy Merged
Go to Animation Shop Edit> Paste> As New Animation Hold down CTRL and keep pressing L until you have 10 frames Edit> Select All ... Edit> Copy
Activate your Tag Edit> Select All ... Edit> Paste> Into Selected Frames ... move into position and click once And that's it. All that's left is to save your Tag ... If you wish to Preview it first View> Animation
Here is another example made by my friend Sezy
Tutorial written on the 28/03/2012 ©David Hanslip |