|
First time trying one of my Tutorials? Then please check my Terms of Use before you continue
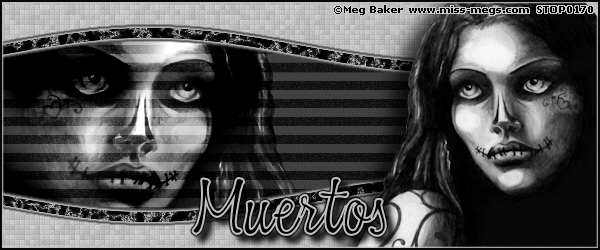
You will need: Font of your choice - I used one called Martini Script Fat Tube & Close Up of your choice - I will be using the artwork of Meg Baker This artist is not currently selling their art in Tube Format My Template SpawnsFSTemplate035
Filters: Eye Candy 6/Gradient Glow Eye Candy 4000/Marble Two Moon/StringThing Xero/Fritillary
Ok let's begin Open my Template ... Window> Duplicate ... Close Original ... Delete the Credits layer Activate the Main Background and Flood Fill with a Color from your Tube Paste your Close Up as a New Layer and position on the left and make sure what you want to keep is visible
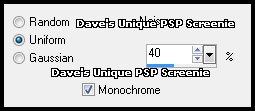
Change your Foreground to Black and your Background to a Color from your Tube Activate the Black Lines layer Adjust> Hue/Saturation> Hue/Saturation/Lightness play around with the settings until your lines are a color you are happy with Adjust> Add/Remove Noise> Add Noise ... with the following settings
Change this layers Blend Mode to Soft Light Activate the Top Wave layer ... Layers> Arrange> Move Down ... Layers> Merge> Merge Down Selections> Select All ... Selections> Float ... Selections> Defloat Flood Fill the Selection with your Background color Effects> Xero> Fritillary ... with the following settings
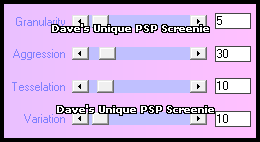
Selections> Select None Activate the Top Wave Line layer ... Layers> Merge> Merge Down Effects> Eye Candy 4000> Marble ... with the following settings
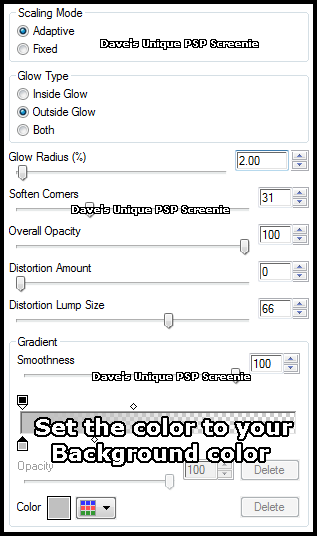
Effects> Eye Candy 6> Gradient Glow ... with the following settings
Effects> Eye Candy 6> Gradient Glow ... change the Glow Radius to 1 and the color to Black Paste your Tube as a New Layer position on the Right side of your Tag and apply a suitable Drop Shadow Layers> New Raster Layer ... Flood Fill with Black ... Selections> Select All Selections> Modify> Contract by 2 ... Hit DELETE on your keyboard ... Selections> Select None Effects> Eye Candy 6> Gradient Glow ... change the color to your Background color
Add Copyrights and your Name ******************************************************************************************* If you wish to keep your Tag None-Animated then Layers> Merge> Merge Visible and then save If you want it Animated let's continue *******************************************************************************************
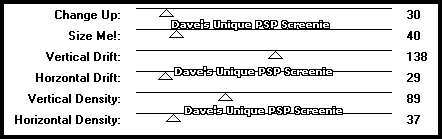
Activate the layer with the Close Up on ... Rename it CU and Duplicate it 3 times (for a total of 4) Activate the CU layer ... Effects> Two Moon> StringThing ... with the following settings
Activate the Copy of CU Layer ... Effects> Two Moon> StringThing ... change the Change Up to 40 Activate the Copy (2) of CU Layer ... Effects> Two Moon> StringThing ... change the Change Up to 50 Activate the Copy (3) of CU Layer ... Effects> Two Moon> StringThing ... change the Change Up to 60 Hide the top 3 CU layers for now ... Edit> Copy Special> Copy Merged
ANIMATING
Edit> Copy Special> Copy Merged
Go back to Animation Shop ... Edit> Paste> After Current Frame Return to PSP hide the "Copy of CU " layer and unhide the "Copy (2) of CU " layer Edit> Copy Special> Copy Merged
Go back to Animation Shop ... Edit> Paste> After Current Frame Return to PSP hide the "Copy (2) of CU" layer and unhide the "Copy (3) of CU " layer Edit> Copy Special> Copy Merged
Go back to Animation Shop ... Edit> Paste> After Current Frame Edit> Select All ... Animation> Frame Properties ... change to 22 and click OK
Tutorial written on the 01/07/2012 ©David Hanslip |