|
First time trying one of my Tutorials? Then please check my Terms of Use before you continue
You will need: Font of your choice - I used one called Penguin Attack Tube of your choice - I will be using the artwork of Ava Schwark This artist no longer sells her art in Tube format My Selection HERE ... unzip into your Selections folder
Filters: Mura's Meister/Copies Mehdi/Sorting Tiles DSB Flux/Bright Noise
Ok let's begin Open a New Image 600x250 ... Paste your Tube as a New Layer Effects> Mura's Meister> Copies ...*Wall Paper(rotate) ...default settings (if you have any transparent gaps on your canvas Edit> Repeat Copies ... same settings)
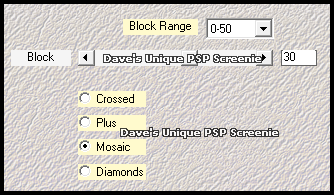
Crop Image 600x250 Effects> Mehdi> Sorting Tiles .. with the following settings
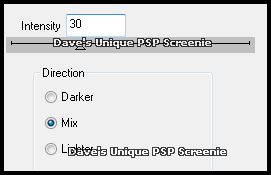
Rename this layer flux ... Duplicate three times (for a total of 4) Rename the Top one Strip ... Activate the flux layer ... Load the Selection I provided with this Tutorial Effects> DSB Flux> Bright Noise ... with the following settings
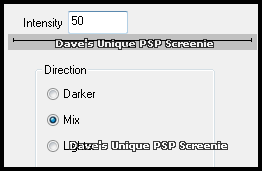
Activate the Copy of Flux layer ... Edit> Repeat Bright Noise ... click on the Mix button once then OK Activate the Copy (2) of Flux layer ... Edit> Repeat Bright Noise ... click on the Mix button once then OK Selections> Select None ... Hide the 2 Top Flux layers for now
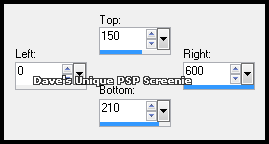
Activate the Strip layer Make a Custom Selection ... with the following settings
Selections> Invert ... Hit DELETE on your keyboard Selections> Select All ... Selections> Float ... Selections> Defloat Layers> New Raster Layer ... Flood Fill the Selection with a color from your Tube Selections> Select None ... Change this layers Blend Mode to Color (or one suitable)
Layers> Merge> Merge Down Effects> 3D Effects> Drop Shadow ... 0, 0, 100, 5, color of choice Edit> Repeat Drop Shadow
Paste your Tube as a New layer, position on the Right side of your Tag and apply a suitable Drop Shadow Layers> New Raster Layer ... Flood Fill with a color from your Tube Selections> Select All ... Selections> Modify> Contract by 2 ... Hit DELETE on your keyboard Selections> Select None
Effects> DSB Flux> Bright Noise ... with the following settings
Add Copyrights and your Name
ANIMATING
Go back to Animation Shop ...Edit> Paste> After Current Frame Return to PSP and unhide the Copy (2) of flux layer ... Edit> Copy Special> Copy Merged
Go back to Animation Shop ... Edit> Paste> After Current Frame
Tutorial written on the 14/08/2012 ©David Hanslip |