|
First time trying one of my Tutorials? Then please check my Terms of Use before you continue
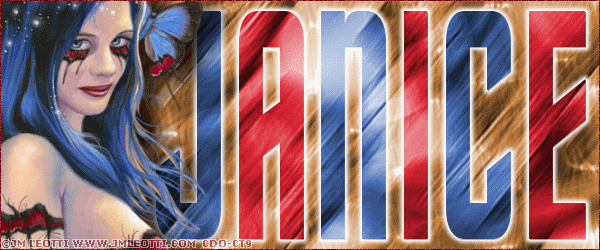
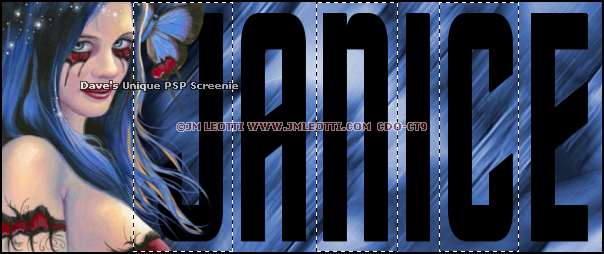
You will need: Font of your choice - I used one called Trek Tube of your choice - I will be using the artwork of JM Leotti This artist is not currently selling their art in Tube Format
Filters: Mura's Meister/Copies Eye Candy 6/Gradient Glow
Ok let's begin Open a New Image 600x250 ... Rename layer Plain Color Duplicate layer Twice ... Flood Fill each layer with a Medium color from your Tube (Top 2 being the colors that will be for Text and Bottom for Background)
With the Top layer Active ... Paste your Tube as a New Layer Effects> Mura's Meister> Copies ... *Wall Paper(rotate) ... default settings Edit> Repeat Copies ... same settings as above
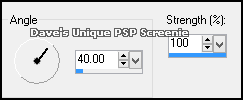
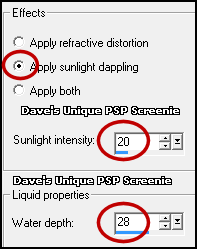
Adjust> Blur> Motion Blur ... with the following settings
Effects> Edge Effects> Enhance More Selections> Select All ... Selections> Clip to Canvas ... Image> Crop to Selection Change this layers Blend Mode to Luminance ... Rename this layer MM
Edit> Copy Special> Copy Merged ... Edit> Paste as New Layer Rename this layer Color 3 ... Hide this layer for now Delete the Copy (2) of Plain Color layer
Edit> Copy Special> Copy Merged ... Edit> Paste as New Layer Rename this layer Color 2 ... Hide this layer for now Delete the Copy of Plain Color layer
Edit> Copy Special> Copy Merged ... Edit> Paste as New Layer Rename this layer Color 1 ... Hide this layer for now Delete the Plain Color layer
Delete the MM layer Unhide ALL layers ... rearrange the layers in your Layer Palette like so Color 3 Color 2 Color 1
Activate the Color 3 layer Paste your Tube as a New Layer, position on the Left side of your Tag and apply a suitable Drop Shadow Activate your Text Tool ... change your Background color to Black and make your Foreground to Transparent/Null Type out your Name (be sure to create as vector) ... before clicking Apply play around with this size til it is something like this
Play around by moving the nodes (lil squares) til your text looks something like this
Once happy with size ... Layers> Convert to Raster Layer Rename this layer Text Activate your Selection Tool ... with the following settings
Make a Selection around every other letter like so
Selections> Promote Selection to Layer Activate the Text layer ... Hit DELETE on your keyboard Selections> Select None
Activate the Promoted Selection layer Selections> Select All ... Selections> Float ... Selections> Defloat Selections> Invert ... Activate the Color 3 layer ... Hit DELETE on your keyboard Selections> Select None
Activate the Text layer Selections> Select All ... Selections> Float ... Selections> Defloat Selections> Invert ... Activate the Color 2 layer ... Hit DELETE on your keyboard Selections> Select None
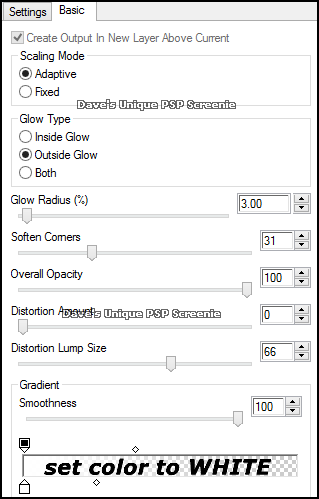
Delete the Text and Promoted Selection layers Activate the Color 3 layer ... Layers> Merge> Merge Down Effects> Eye Candy 6> Gradient Glow ... with the following settings
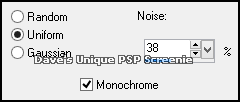
Activate the Top layer ... Layers> New Raster Layer Flood Fill with color of your choice Selections> Select All ... Selections> Modify> Contract by 1 Hit DELETE on your keyboard ... Selections> Select None Adjust> Add/Remove Noise> Add Noise ... with the following settings
Add Copyrights ... Activate the Color 1 layer ... Edit> Copy
ANIMATING
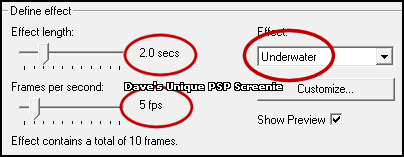
Click on the Customize button
Change the first 10 waves to the following Wave 1: X 14 ... Y -21 Wave 2: X 3 ... Y -19 Wave 3: X -12 ... Y -14 Wave 4: X 6 ... Y 17 Wave 5: X -16 ... Y 17 Wave 6: X -6 ... Y 17 Wave 7: X 20 ... Y 7 Wave 8: X 27 ... Y -7 Wave 9: X -27 ... Y 8 Wave 10: X -25 ... Y -1
Set all other waves to X 0 ... Y 0 Click on OK then on OK again ... DELETE the first Frame
Return to PSP and hide the Color 1 layer ... Edit> Copy Special> Copy Merged Go to Animation Shop ... Edit> Paste> As New Animation
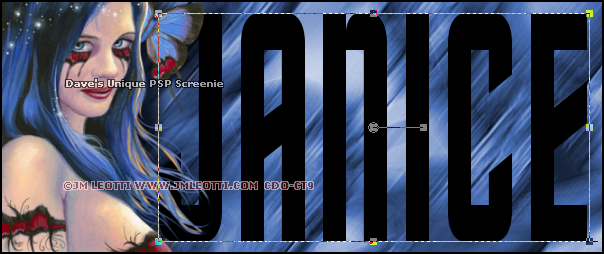
Edit> Select All ... Edit> Copy Activate you Animation ... Edit> Select All ... Edit> Paste> Into Selected Frames Move into position and click once (I zoomed in to help with positioning)
Close the Image that has the layers without the Background as it is no longer needed And that's it. All that's left is to save your Tag ... If you wish to Preview it first View> Animation
Tutorial written on the 10/08/2013 ©David Hanslip |